For the menu of a website I used a custom font via CSS. I used a .ttf font but this applies to .otf as well. For some reason, some PC’s with Windows 8.1, Internet Explorer 11 would not display the custom font though. Others with the same sub-version software would work fine. I had no explanation for it and it was hard to find the problem without access to a PC that lacked the error.
‘Fortunately’ the Windows 8.1 / IE11 that I have on the side on my MBP now also featured this problem. Now I had the opportunity to investigate it.
It was not a typo, the relative link worked as fine as the absolute version and it didn’t seem to matter if I used single or double quotation marks or none at all.
Use F12 in IE or secondary-click on the text and choose ‘inspect element’ to invoke the debugger / web info window. I found out this error in the console:
CSS3114: @font-face failed OpenType embedding permission check. Permission must be Installable.
<slightly annoyed>Apparently, in a micro-sub-update of IE11, someone at Microsoft had decided that from now on, these permissions had to be obeyed by the world.</slightly annoyed>
Long story short, this means that the fsType of the linked font file was not set to be used freely when it was generated. There are some tools to change the font file, like ttfpatch and but I couldn’t find one for Mac OS X. Of course this can still be done on a Mac with a font creation application. I tried FontLab 5.1 and it worked fine, but you can probably do this with other font software as well. Here’s the recipe on how to set the font embedding permission to Installable on Mac OS X.
Set the font permission to Installable on Mac OS X
- Open the font with FontLab.
- From the menu, choose ‘File > Font Info…’ or type ALT-CMD-F.
- In the left column, click on the little triangle to the left of ‘Names and Copyright’.
- Select the submenu ‘Embedding’
- On the right part of the window, set the pulldown menu to ‘Everything is allowed (installable mode)’.
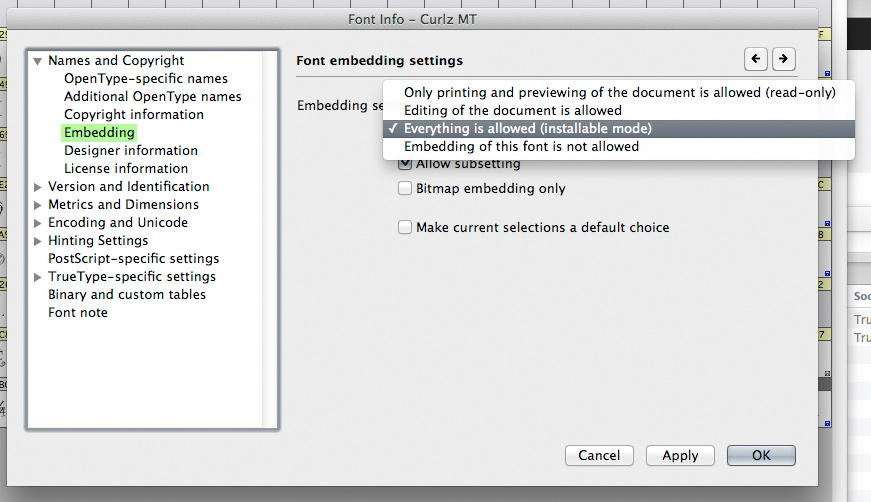
- Click ‘Apply’ and close the window by clicking ‘OK’.
- Again from the ‘File’ menu, choose ‘Generate Font’ or ALT-CMD-G and save it.
- Upload it to your website and replace the more restricted version of the font.
You might want to give it a slightly different name, to indicate the distention with the restricted version, or maybe you only want to keep the Installable version.